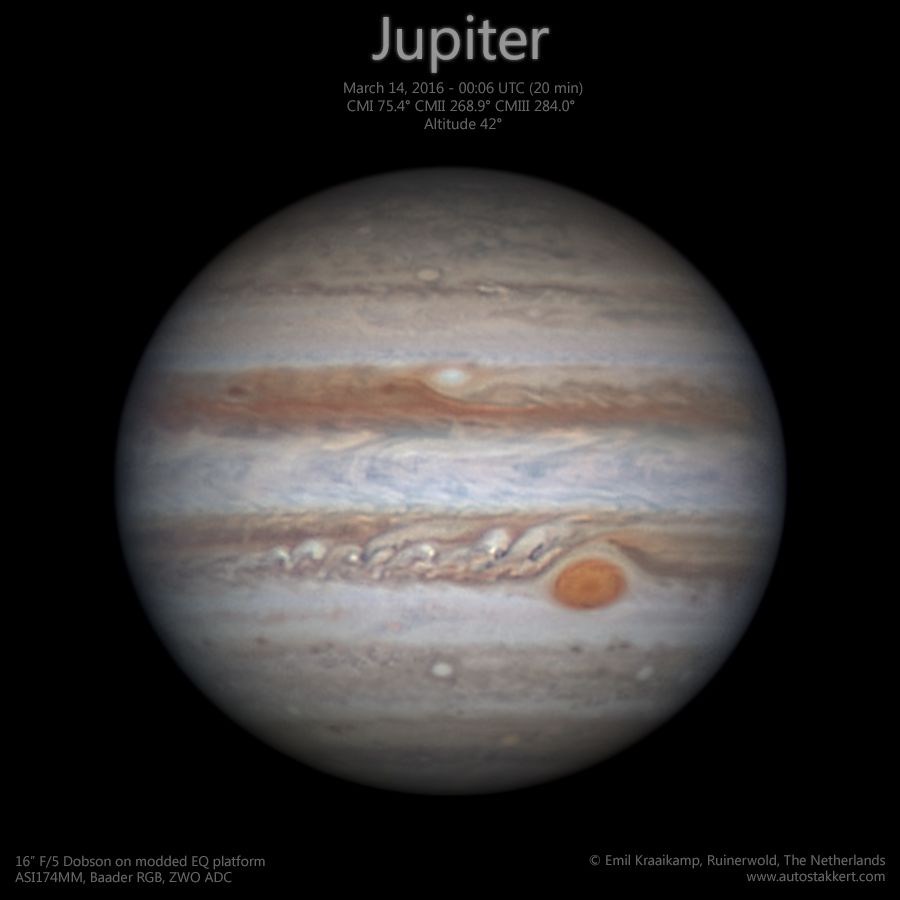
A couple of nights ago I was lucky enough to have some decent seeing conditions to image Jupiter. I almost missed it, it was rather windy – and freezing cold, weird for winter – and the seeing predictions weren’t that good either, but because I saw other astrophotographers producing nice images, I decided to go outside anyway. I was happy I did.
My first view through the eyepiece saw a relatively stable looking Jupiter with plenty of contrast. Much better than anything I had soon during the past months, if you only see poor seeing you quickly forget what decent seeing looks like. Anyway, that one view through the eyepiece made quickly reach for the electronic equipment, so I could start imaging for the next couple of hours. I was not going to waste this opportunity by just staring at Jupiter through an eyepiece. That would be a huge mistake.
I had been without an equatorial platform for my Dobson for a few weeks, but I was just in time to have a new platform more or less in working condition. After half an hour into imaging I had to rush back inside and fix some manual declination controls I added just hours before the recording session started – basically I had to apply a bit of lock bond to make sure the bolt stayed fixed when I turned the declination control – but other than that I had everything I wanted: decent tracking capabilities and a possibility to correct for my poor polar alignment.
Processing this image all in all took about 5 hours, as I wanted to combine as many images as I could using WinJUPOS. For this image I let WinJUPOS derotate each slightly sharpened stack I had selected to the same reference, and then I manually recombined all of those again in Photoshop, taking only the best (parts of) each stack. I like this semi-manual approach, as it gives you lots of control, and involves lots of fiddling around with image processing software. But it does take forever though. The seeing wasn’t that great really, I only stacked about 30-40% of the frames for each recording, but the transparency was good and being able to use this many stacks really helps to bring out the finer details and contrasts. I had recorded for several hours at a time, but in the end I combined only the best 4 red channels, and 2 green and blue channels each, that all happened to be imaged within about a 25 minute time period of more stable conditions. The other recordings just weren’t anywhere as useful.
Anyway; by far my best Jupiter this season, and I’m quite pleased with the result.
wow. beautiful.
Superb! It is amazing detail and quality!
Congratulations, Emil !
A marvelous picture 🙂
Emil, I’m happy that you did find a little time for coming back to Astronomy. Be sure that here in France a lot of people are using AS!2and appreciate its fine results 🙂
Wonderful!
Jerry
Hello Emil, it’s just an Amazing capture and elaboration too… I think one of your best of Jupiter! I think that we all amateur astronomers and astroimagers must all thank you “for life” for creating Autostakkert, in my opinion the best planetary stacking software of all.
Best regards…
Carmelo “Mel” Zannelli
Hi Emil, I have to say “WoW” Very Nice indeed