the title says it all
Live Talk Woodland Hills Cameras and Telescope
On August 8, 2020 I gave a live presentation on the Woodlands Hills Cameras and Telescope youtube channel, about AutoStakkert. I thought it was going to be a small presentation, but it ended up being almost 2 hours long… I tried to cover pretty much all the features in the software, using a development version of AutoStakkert!4 that will hopefully be ready for release later this year.
The video is available on their youtube channel, and is also embeded below. I hope this video can help some people out on how to try and extract the best images out of your recordings!
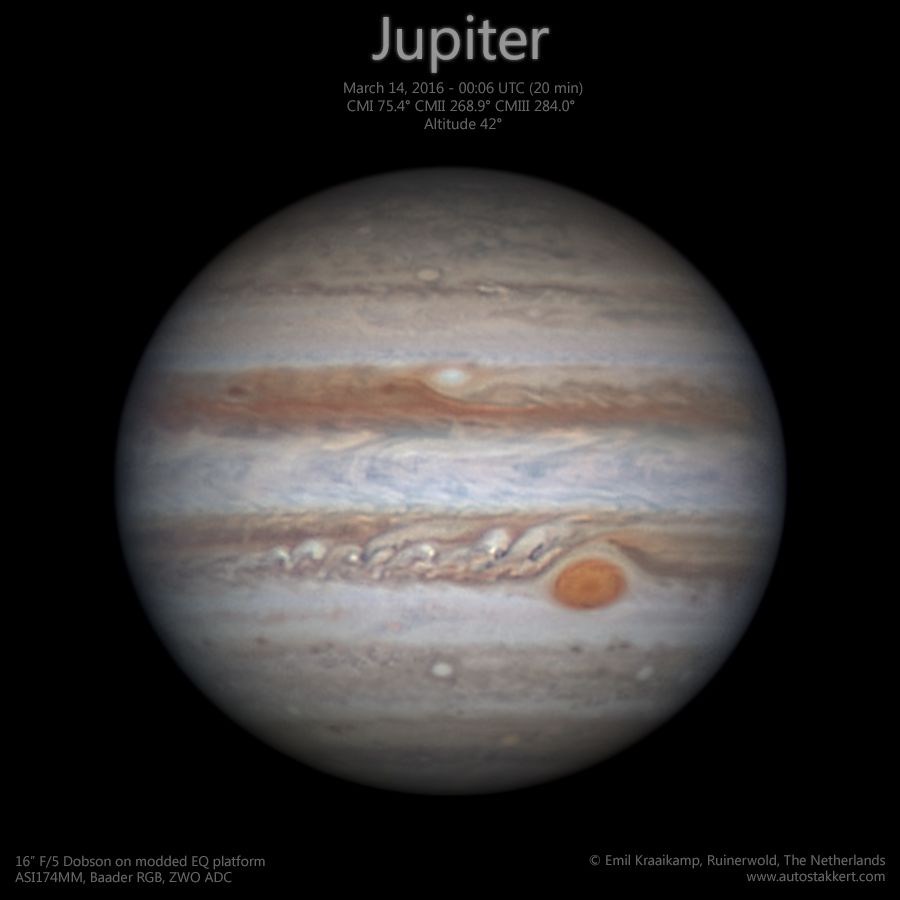
Jupiter in 2016
A couple of nights ago I was lucky enough to have some decent seeing conditions to image Jupiter. I almost missed it, it was rather windy – and freezing cold, weird for winter – and the seeing predictions weren’t that good either, but because I saw other astrophotographers producing nice images, I decided to go outside anyway. I was happy I did.
My first view through the eyepiece saw a relatively stable looking Jupiter with plenty of contrast. Much better than anything I had soon during the past months, if you only see poor seeing you quickly forget what decent seeing looks like. Anyway, that one view through the eyepiece made quickly reach for the electronic equipment, so I could start imaging for the next couple of hours. I was not going to waste this opportunity by just staring at Jupiter through an eyepiece. That would be a huge mistake.
I had been without an equatorial platform for my Dobson for a few weeks, but I was just in time to have a new platform more or less in working condition. After half an hour into imaging I had to rush back inside and fix some manual declination controls I added just hours before the recording session started – basically I had to apply a bit of lock bond to make sure the bolt stayed fixed when I turned the declination control – but other than that I had everything I wanted: decent tracking capabilities and a possibility to correct for my poor polar alignment.
Processing this image all in all took about 5 hours, as I wanted to combine as many images as I could using WinJUPOS. For this image I let WinJUPOS derotate each slightly sharpened stack I had selected to the same reference, and then I manually recombined all of those again in Photoshop, taking only the best (parts of) each stack. I like this semi-manual approach, as it gives you lots of control, and involves lots of fiddling around with image processing software. But it does take forever though. The seeing wasn’t that great really, I only stacked about 30-40% of the frames for each recording, but the transparency was good and being able to use this many stacks really helps to bring out the finer details and contrasts. I had recorded for several hours at a time, but in the end I combined only the best 4 red channels, and 2 green and blue channels each, that all happened to be imaged within about a 25 minute time period of more stable conditions. The other recordings just weren’t anywhere as useful.
Anyway; by far my best Jupiter this season, and I’m quite pleased with the result.
Mars
Here is my latest result: Mars imaged on May 17 under pretty good conditions (well, for Dutch conditions of course). I still have some recordings left to process from the night before, and I’m really curious to see the changes in the results from one day to the next as the clouds on Mars can be pretty dynamic!
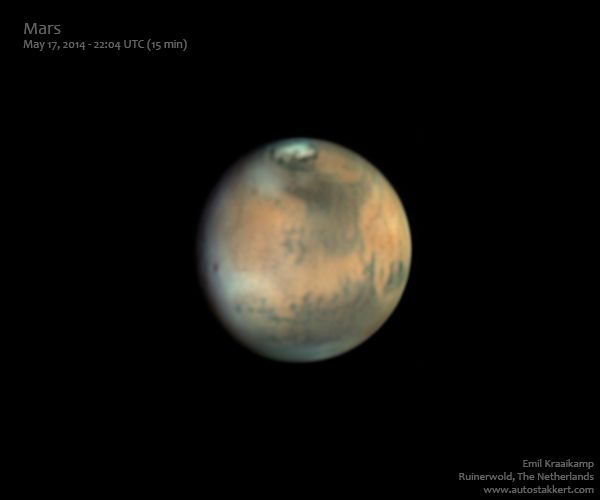
For this recording I used the ASI120MM monochrome camera (as usual) and some Baader color filters. Processing the data took quite some time: out of 50 recordings I wanted to select only the most promising ones to then further process using AutoStakkert!2. To this end, I first let AS!2 quickly batch-process all recordings using just a single alignment point and then manually previewed and selected the resulting stacks. The best recordings were then processed more carefully using AS!2. This is actually an often used ‘trick’ by planetary astrophotographers: not only do we perform lucky imaging within a recording, by letting AS!2 select and combine only the sharpest portions of frames, but also between recordings, where we basically select (or show!) only the best recordings out of hours of material.
Mars rotates once in about 25 hours, but if you record using a monochrome camera every color after each other, there is a small color displacement between the channels when you turn the images into a color image. Because the recordings I made were quite lengthy, and especially far apart in time, I used WinJUPOS to compensate for the planet rotation by derotating the stacked images. Using this technique, it is even possible to combine multiple recordings together to increase the signal to noise ratio (produce prettier images), or even get rid of some sharpening or diffraction related artifacts in high-contrast areas.
Anyway, lots of cool stuff can be seen in this image of Mars. The little dark dot on the center left for example is a large shield volcano Ascraeus Mons peaking through some water ice clouds. Also clearly visible is the north polar cap consisting mostly of water ice during summer.
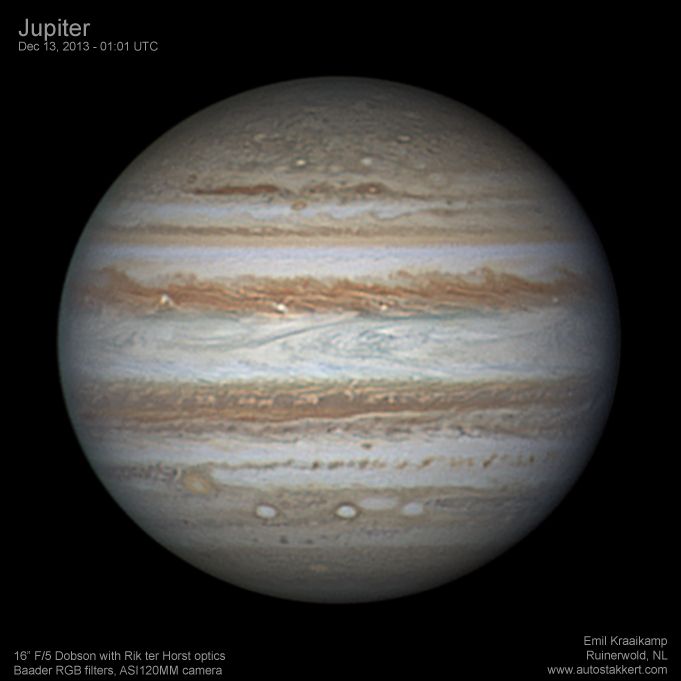
Jupiter
Finally some good seeing!
The image was made with a 16″ F/5 Dobson, Baader RGB filters, and an ASI120MM camera operating at about F/15. Of course the image was processed in AutoStakkert!2. Post-processing with Photoshop and WinJUPOS, to derotate the stacks.
The Orion Nebula 1/2

Occasionally, I’m going to use this blog to show some of the images I made. When I do that, I will try to tell just a little bit about how the image was made, and what it actually is that you are looking at. Today I will discuss an image of M42 that I made over a year ago on the night of November 18-19 2012. I planned to post this story soon after the images were taken, but for some reason that never happened…. Anyway, here is the first part of the rather long story that will probably be completed in a year from now…
I did not want to go outside, because I had to get up early the next morning and was already tired. But astrophotographers are weird people, especially when they live in areas where the number of good clear skies per year is astronomically (ha!) low. Whenever there is an opportunity to observe the night sky, you take it, even if you don’t really want to. Because before you know it another month has passed without any clear skies, and you would just feel bad about not imaging when you could have.
So I went outside. It was cold. It was also slightly foggy, which I did not like, because it meant the air was probably steady. And that in turn meant the images would probably be good, and that I also was not going to get much sleep this night. So I set up my telescope, connected the remote controller of the focuser, turned on the ventilator at the back of the telescope tube to force a temperature equilibrium, checked and corrected the alignment of the optics, and pointed the telescope to Jupiter. The Moons of Jupiter looked very steady: the seeing was good. Tomorrow I was going to be tired.
I pretty much never look through the telescope myself, but let a camera do that for me. This way I can see many more details, and share the image with other people as well. So I powered up my laptop, added the filter wheel, barlow, and camera, turned off the ventilator again because it can cause slight vibrations, and then started imaging Jupiter for the next three hours. The Orion Nebula was still too low at the horizon, so it did not make much sense to start imaging that, but generally I also prefer imaging planets as they are more dynamic. The planets also require more magnification, which means that you can only see them in high detail when the seeing is very good. The seeing was very good, so to me it was obvious I should image a planet, and the biggest one available this night was Jupiter.

But as this post is actually about the Orion Nebula, let’s fast forward to around 2 AM. It was still cold: there was a layer of ice on my telescope, I had to defog the secondary mirror a couple of times with a hair dryer, and my fingers were freezing. The seeing was slowly getting worse as well, so I was pretty much done with Jupiter. And then I noticed Orion, and in particular the fuzzy spot at the center of three stars making up the sword of the Hunter, close to the larger structure of the three stars making up its belt. That is where we can find the Orion Nebula.
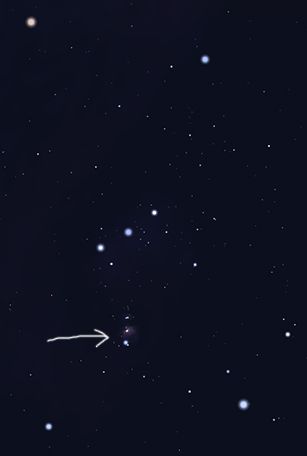 As you probably know, everything in space is huge. Even Jupiter – whose light ‘only’ takes about 40 minutes to get here – is already enormous: Earth easily fits into the hundreds of years lasting storm on Jupiter – the Great Red Spot – and we could place more than half a million Earths on a straight line from here to Jupiter. In the Orion Nebula light takes about 24 years (!) to get from one side to the other, which means that if every human being on earth had its own Earth-sized planet on a straight line inside the Orion Nebula, there would be room for 27 thousand Earths… for each of us. The Nebula itself is relatively closeby: light only takes 1200 years to get from there to here, our closest neighboring galaxy is 200 thousand times further away. Anyway, you get the picture, there is plenty of space in space.
But when we zoom in a little bit on just the center of the Orion Nebula, this is what we see:
This image was made during the night in question with my 0.25 m Newton telescope. Of course, it does not come close to what Hubble can see when staring at M42. But for Hubble it is relatively easy: it has a huge 2.4 meter mirror that can collect light about 92 times faster (!) than my telescope can, and can resolve details that are at the very least 10 times smaller. But Hubble is also floating in space which means that it does not have to worry about the Earths atmosphere which has a tendency to distort images, especially when trying to view really tiny details, and even more so when using long exposure times. Because the longer you expose an image, the more our atmosphere has the chance to distort it.
Unfortunately, this is where the story ends for now. Keep checking this blog for a follow up! For now I’ll end with two close-ups of the image posted above. You can actually see protoplanetary disks here: disks of dense gas surrounding stars that have basically just been formed!


Beta version
A quick reminder for those interested in playing around with the latest AutoStakkert!2 lucky imaging software: there is a beta version of AutoStakkert!2 available at the AutoStakkert!2 beta website
The versions displayed on that site have not been tested a lot, but it generally works quite well and has interesting functionality such as:
- improved flat frame support
- native support for mjpeg, ser, fits, and many avi videos and image files
- extended support for additional video formats using windows codecs
- additional mov support using FFMpeg
- more speed (overall about 2X faster)
- alt-az derotation
- sigma clipping satcking
- and many more…
And of course, all of these nicely hidden from view (but easily available) so if you just want an easy to use, fast and high quality lucky imaging stacking program, it is still there.
If you find any problems with a beta, please let me know so I can fix them. I’m currently using 2.3.0.8 myself without any problems, but small updates are frequently performed that might brake or – preferably – improve the software further.
To keep the UK society safe
No idea what GCHQ would want to do with my software, or if this email was actually real to begin with, but since it is unclassified – and never got a response to my reply – I’ll just post this message here simply because I can.
O, and keep an eye on this blog, because I haven’t been sitting still lately! A new beta version shall be released soon, including support for better spectral stacking, direct reading of all avi files if you have the appropriate avi codec installed, etc etc.
Subject: Autostakkert 2.
Protective Marking: UNCLASSIFIED
Hi
We are interested in trying out your software and wondered if there is an End User License that we can look at before proceeding.
Regards
SAM DSL
GCHQ
Cheltenham01242 ******
****************************************************************************
Communications with GCHQ may be monitored and/or recorded
for system efficiency and other lawful purposes. Any views or
opinions expressed in this e-mail do not necessarily reflect GCHQ
policy. This email, and any attachments, is intended for the
attention of the addressee(s) only. Its unauthorised use,
disclosure, storage or copying is not permitted. If you are not the
intended recipient, please notify postmaster@gchq.gsi.gov.uk.This information is exempt from disclosure under the Freedom of
Information Act 2000 and may be subject to exemption under
other UK information legislation. Refer disclosure requests to
GCHQ on 01242 221491 ext 30306 (non-secure) or email
infoleg@gchq.gsi.gov.uk****************************************************************************
The original of this email was scanned for viruses by the Government Secure Intranet virus scanning service supplied by Cable&Wireless Worldwide in partnership with MessageLabs. (CCTM Certificate Number 2009/09/0052.) On leaving the GSi this email was certified virus free.
Communications via the GSi may be automatically logged, monitored and/or recorded for legal purposes
Enhance!
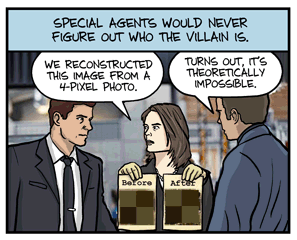 Every now and then there is a dramatic TV show on where the good guys are ‘digitally enhancing’ a few pixels to create an ultra-sharp image of the face of a villain. The bad guy is recognized, he is caught, and the world is again safe. Of course we all know this is impossible. There were only a few pixels to work with, it can’t be done.
Right?
Well, it is indeed impossible if you only had those few pixels to work with, but if you have more than one image of the same target, either from slightly different viewpoints or taken over time with a slight offset in the images, it turns out it actually is possible. It is only possible though if the images are both under-sampled and you can determine the offset of the target with sub-pixel accuracy.
If the images are not under-sampled – like it is the case for most high resolution astrophotography images – the first frame would contain the same information as any of the other frames. Apart from a little bit of noise of course. Stacking the images would certainly increase the signal to noise ratio, and you can even reject frames that are too blurry or compensate for the movement a bit, but you will never be able to go beyond the diffraction limit of the optics. You will need a larger aperture to get more detail.
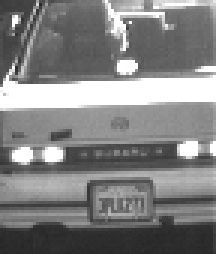
If you can’t determine the offset of the target in the image, then even if it did contain extra information, we wouldn’t know where to place it! Luckily, accurately determining offset in images is no problem at all for AutoStakkert!2. If you do have under-sampled images to play around with, the fun can begin. I found an interesting data-set of a tiny video containing several frames of a moving car. One of these images is shown above. It is enlarged to 300% to show the individual pixels it was made up from.
Now let’s use AutoStakkert!2 to stack twenty of these images from a small sequence where the car is moving through the field, and sharpen the results a little bit.
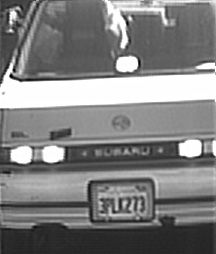
All of a suddon we can read the license plate, and even the brand at the back of the car! We actually cleaned up the image and enhanced it. Super Resolution does indeed give you super resolution.
AutoStakkert!2 uses an advanced technique called drizzling – officially known as Variable Pixel Linear Reconstruction – which was originally developed for the hubble telescope to achieve sharper results for undersampled images. Drizzling was applied to several tiny sections in the images to compensate for any image distortions. Combine this with an accurate estimation of the location of the features throughout the image, and you can end up with a lot more resolution than you started with even when the field of view is changing.
Apart from making Hubble images sharper, Super Resolution is also applied to telescopes actually peaking down to earth. Some might find it interesting to see an enemy tank or structure when it was hardly visible in a single image. More down to earth implications are to actually do what we did here: read license plates of speeding cars, or indeed to recognize the bad guys in a video of a robbery. Unless the bad guys wore masks of course.
To sum things up: Super Resolution is real. If you have just one image containing a few pixels there is little you can do. But if you have a lot of slightly different and under-sampled versions of those pixels, then you can significantly increase the resolution of your images! For planetary astrophotography this is hardly ever the case however. Sometimes drizzling can give sharper results for low focal length recordings: when imaging the Sun in good seeing conditions at low magnifications for example. For short exposures of deepsky targets at lower focal lengths there is a much bigger chance it will actually increase the effective resolution. For most planetary recordings there simply is little to gain by drizzling.
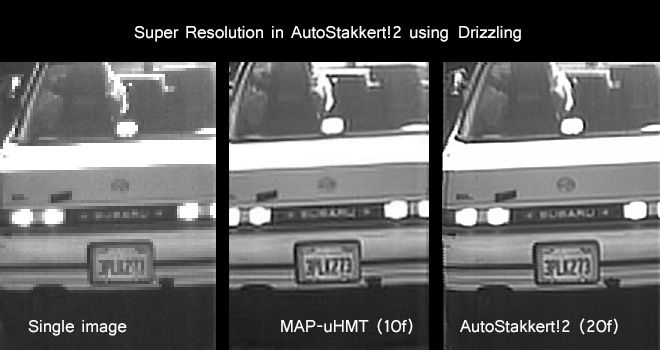
AutoStakkert!2 does not use the MAP-uHMT method shown in the image above. The MAP-uHMT technique was developed by Dr. Feng Li at the University of New South Wales. AutoStakkert!2 only produces raw stacks, and to correct for residual image blurring these stacks have been manually sharpened in Photoshop using the smart-sharpening tool. Better results can likely be obtained when using more advanced deconvolution methods to get rid of residual image blurring.
Still working..
Instead of just presenting a new and unfinished AutoStakkert!2 version – remember that I said it would be released AROUND the end of August – I thought it might be nice to start keeping a small log here to keep you up-to-date with what I’m actually working on.
I still have a long list of new features and bugfixes to implement. I know that some of these are more important than others, but somehow I always start implementing those ideas that I enjoy working on the most. At the moment I seem to be very interested in getting the best performance out of AS!2, without a decrease in image quality of course. I know AS!2 is already quite fast, but perhaps it is possible to make it significantly faster? Getting a speed boost of 5% is nice, but if I need to put in a lot of hours that could be spend on new functionality it would hardly be worth the effort. However, if you can decrease the total processing time a lot, you could for example process more recordings in the same time, or experiment on the same recording to find better stacking parameters that will actually end up improving the image quality. It is also much more fun to work with a program that is fast.
So my main priority now has been to make all the critical code in AS!2 as fast as possible, without compromising image quality. I think I succeeded. Aligning images and creating a reference frame is now almost twice as fast. Stacking monochrome* images is more than twice as fast, and performing surface alignment received a speed boost of about 30%.
Now it is back to the boring list of other to-do’s…
* I still need to have a look at the color stacking code (and drizzling), but I don’t think there is a lot of performance to be gained there.